Get Started
Get started integrating JumiaPay by creating a JumiaPay Business account and getting your API credentials.
Step 1: Create a free account on JumiaPay Business if you haven't got one
Step 2: Get your business approved
Step 3: Get your API credentials
Step 4: Get your Sandbox account information
Step 1: Create a free account on JumiaPay Business if you haven't got one
Before you begin integrating with JumiaPay, you should create your free account on JumiaPay Business. To do so, please follow the steps bellow:
- Start by creating an account on JumiaPay by inserting your chosen email address and password here.
Note that the email you are using to create your JumiaPay Business account will be set as the administrator of the account. You can then create new users to access your account and assign them different roles with different permissions.
-
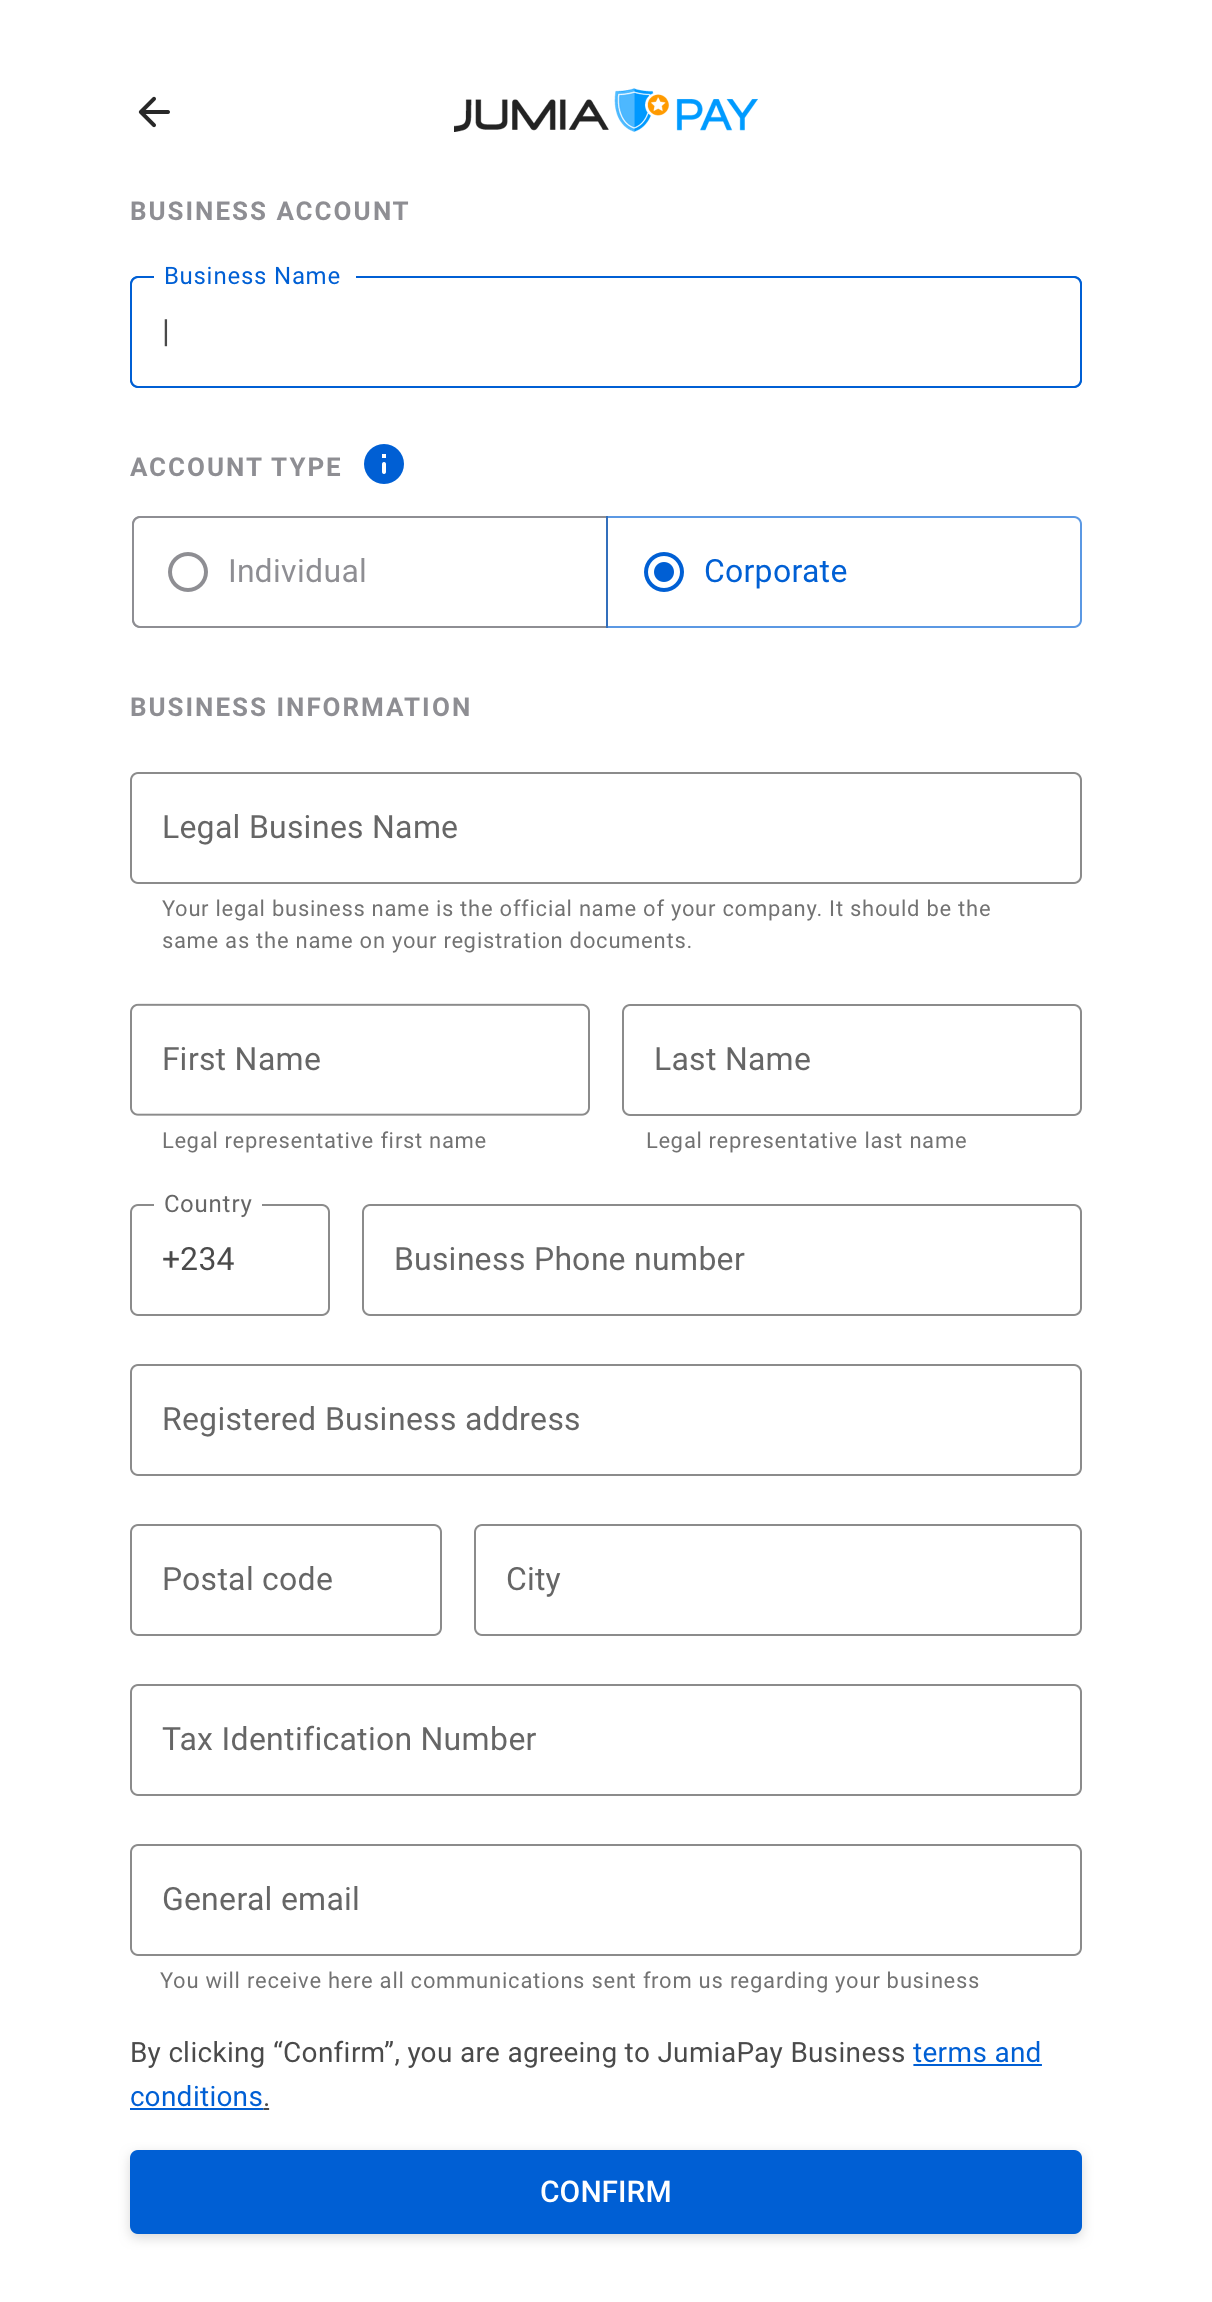
Choose your Business account name and select the type of the Business you own. Then, fill the form with your Business information.
- For Individual Businesses:
- First and last name
- Business phone number
- Registered Business address
- Postal code
- City
- General email for communications
- For Corporate Businesses:
- Legal Business name
- First and last name
- Business phone number
- Registered Business address
- Postal code
- City
- Tax identification number
- General email for communications
- For Individual Businesses:
-
Click on Confirm after filling the form.
-
At this point, your Business account has been created successfully!
Step 2: Get your business approved
After creating your JumiaPay Business account, we invite you to provide us more information about you and your Business in order to fulfill our KYC (Know Your Customer) guidelines. The KYC procedure aims to verify the identity of your Business in order to help us prevent risks related to identity theft, financial fraud or money laundering. In order to complete this step, proceed as follows:
-
Access your JumiaPay Business account here.
-
On the Get Started module, click on the Business Information button.
-
Fill the form with information about your Business and submit it.
Ensure that you have all relevant data:
- Name
- Email address
- Phone number with the international code
- Name of legal entity
- Type of legal entity
- Commercial name of the company
- Types of services and/or products you sell
- Address
- Country
- Do you service international customers?
- Email of the legal team and compliance team, if there is one
- Date of legal entity creation
- Do you already have a payment service provider? If yes, please provide the name of your current service provider
- How many transactions per year do you expect with JumiaPay?
- How much per year do you expect will be your payment volumes with JumiaPay? Please specify the currency
- How many refunds per your do you expect to do?
-
Someone from our team will then contact you so you can get some guidelines on documents we might require and extra information about your Business.
-
After the KYC process is handled by our team your Business will be approved and get activated!
Step 3: Get your API credentials
In order to integrate JumiaPay as a payment option in your shop website you'll need API keys so we can identify your Business. These keys will be used to authenticate your API calls.
- The API keys will be provided by our team, via encrypted email, after your Business gets approved.
Note that JumiaPay will provide you API keys for both sandbox and live environments.
- Once we've provided you the API keys you'll be all set to start integrating JumiaPay!
To submit API requests, you'll need to send us a Shop key that identifies your Business shop. You can get it by following these steps:
-
Access your JumiaPay Business account here.
-
Go to the Shop Configurations module.
-
Copy your Shop key.
If you have any questions about this process or if you believe your keys have been compromised for some reason, please contact us at [email protected].
Step 4: Get your Sandbox account information
JumiaPay has a testing environment available for you, which will be acting like a sandbox for the Businesses to integrate, test and monitor fictitious transactions.
You may create a JumiaPay Business test account or login in one by acessing to https://business-sandbox-pay.jumia.com.eg.
You may also create or login in a Customer test account by accessing to https://sandbox-pay.jumia.com.eg.
While testing JumiaPay API don't forget to:
- Include the url to the API service for the sandbox: https://api-sandbox-pay.jumia.com.eg
- Authenticate your API calls by including your sandbox API key (shared by our team via encrypted email) in the authorization header of every request you make.
- Fill the
shopConfigparameter with your sandbox Shop key, shared on your JumiaPay Business test account.
Once your project is ready to go live, you just need to switch over to the production url and keys.
Setup JumiaPay as Payment Option
There are two possible ways for a Business to display JumiaPay as a payment option on his website:
- Integrate JumiaPay Merchant API
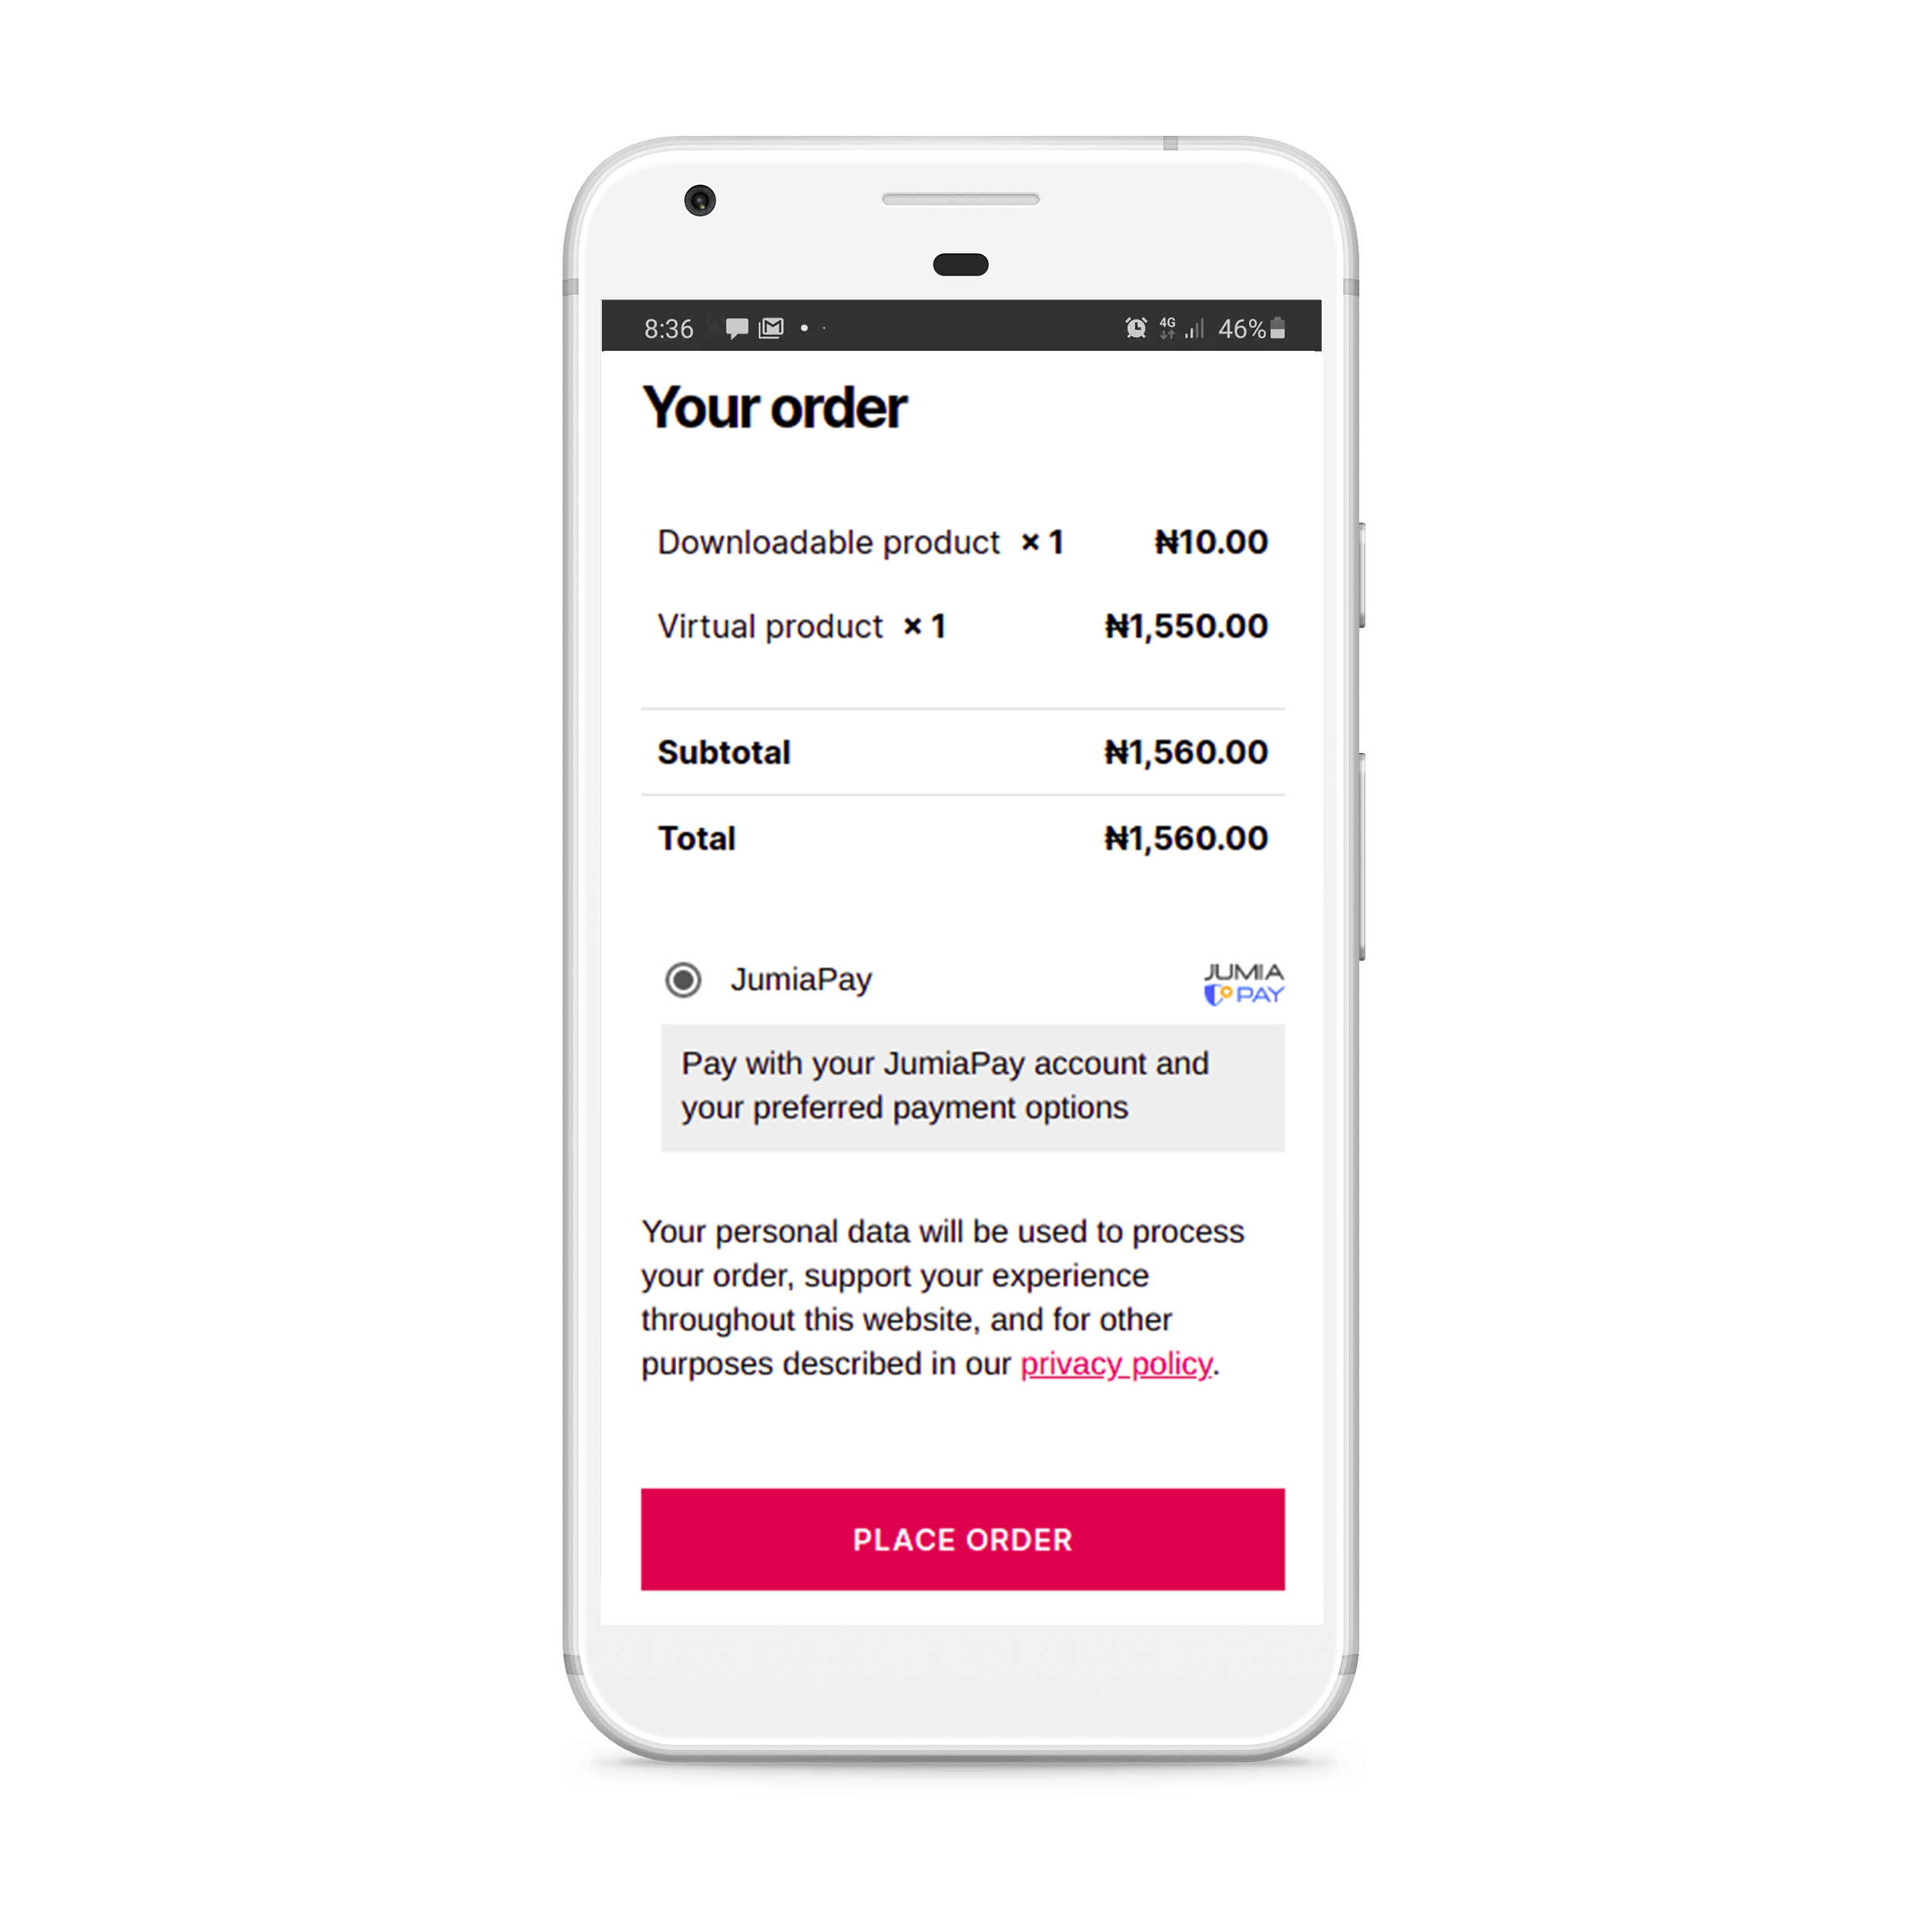
JumiaPay Merchant API allows you to easily integrate JumiaPay on your website. Once integrated, you'll be able to accept payments online from your customers through a secure one step checkout experience.
Calling our /merchant/create endpoint will return a link to which you can redirect to load JumiaPay checkout page with the order details. Here your customers will be able to pay your products/services by selecting a payment method, inserting the payment details and completing the payment.
- Install JumiaPay plugins
We offer payment gateway plugins to help you enable JumiaPay as a payment option on your e-Commerce store. Once installed and configured, your customers will be able to select JumiaPay on your website to proceed with the order payment through JumiaPay checkout page. The download and installation of these plugins are free of cost.
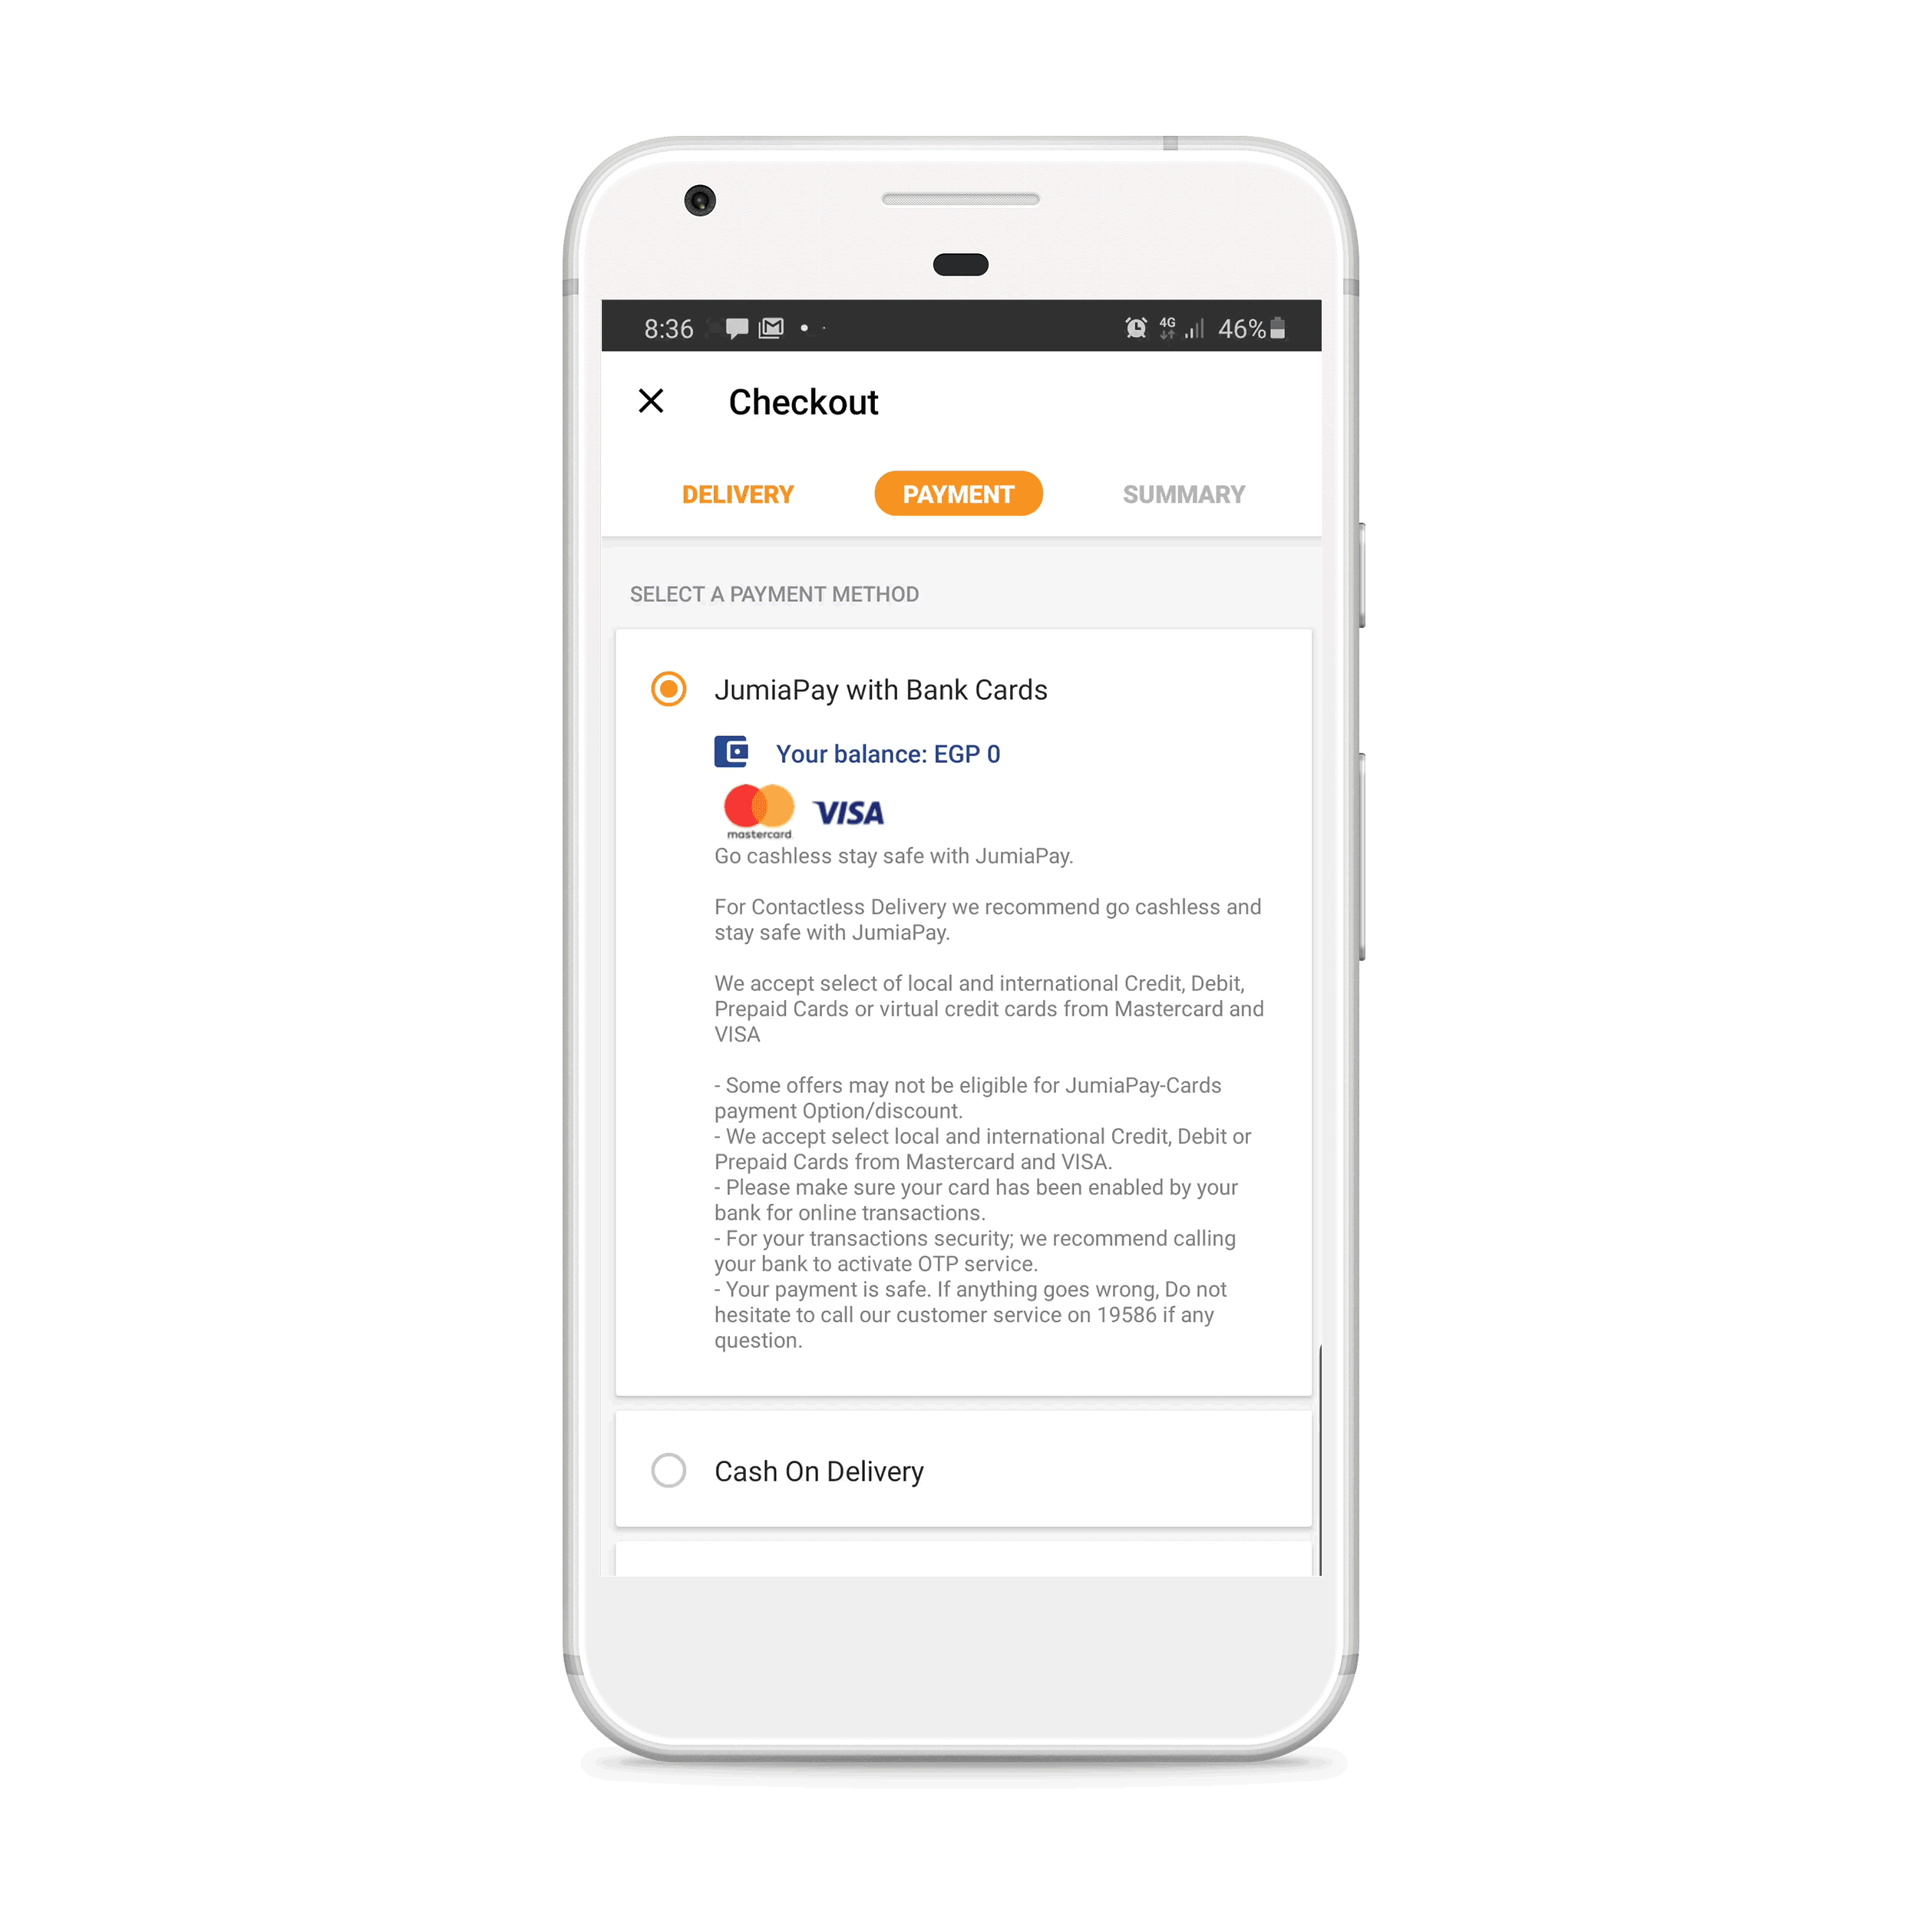
Currently, JumiaPay enables you to accept payments in Nigeria and Egypt. The payment methods available in each country are:
-
In Nigeria:
- Bank Transfer
- Cards (Mastercard, Visa, Verve)
-
In Egypt:
- Cards (Mastercard, Visa)
- Fawry
- Meeza Digital - Mobile Wallets
-
In Kenya:
- Mobile Money (M-PESA & Airtel Money)
- Cards (Mastercard & Visa)
Pre-requisites:
Before you start, check out these tips to assure a smooth experience:
-
First, you'll need to have a JumiaPay Business account. If you still don't have one, you may create it at no additional cost. Just follow our guidelines on Get Started.
-
Check out our API Documentation or Plugins for detailed information.
-
If your Business has an Android or IOS app, check WebView for Mobile Applications.
-
Don't forget to use your sandbox data while testing your integration with JumiaPay.
-
Contact us at [email protected] in case you have any doubt or need some advice.
API Overview
JumiaPay offers an API that enables you to accept payments online from your customers and verify their status. We also make it possible for you to cancel these payments when needed and refund your customers.
Here follows an overview on JumiaPay API. For more information about the parameters that you should send in each request or about success and error responses check our detailed API Documentation.
Authentication
Authenticate your API calls by including your API secret key in the authorization header of every request you make:
| Key | Value |
|---|---|
| apikey | Fill in with the API key shared by us via encrypted email |
| Content-Type | application/json |
Create Purchase
To initialize a transaction on JumiaPay, call the /merchant/create endpoint from our API.
You'll need to collect and send us some customer information, such as the Email Address, IP Address and Country. You'll also need to send the transaction Total Amount, Currency, some Basket Details like the Product(s) Name, Quantity and Price Amount, an Unique Reference to identify the transaction on your system, the Id provided by us to identify your shop (which you can get by following the instructions on Get Started - Step 3), a Return Url and a Callback Url.
When this API call is successful, a Checkout Url will be returned. By redirecting the customer to this url, you will enable him to access JumiaPay so he can to insert his payment details and complete the payment. Once the customer confirms the payment, he'll be redirected to the website set by you on the purchaseReturnUrl parameter. If you don't set this parameter when calling our API, we won't be able to redirect the customers to your website after the payment is done.
Sending us a purchaseCallbackUrl will enable JumiaPay to call this url and send you an update of the transaction status everytime it changes.
It's very important that you check our Callback response to confirm the transaction status before delivering value to the customer! Be aware that just because the customer reached your website, it doesn't mean the transaction is already successful. The transaction should only be considered successful when it reaches the status 'Completed' on JumiaPay side, never before.
You may find an example of the Callback request body that JumiaPay will send to you here.
Here's a brief explanation of the possible status a transaction can assume:
| Status | Description |
|---|---|
| Created | It's the first status of the transaction in JumiaPay. When we get the request from the merchant, the transaction will be in this status. |
| Confirmed | When we get a successful payment to fund the transaction. At this point, the money is already on JumiaPay side. This is a transitory status, which means that the transaction should not be in this status for a long period. |
| Committed | When the merchant confirms that he received our notification and that he will fulfill. Today this is done automatically by our system, there's no need of confirmation by the merchant. This is a transitory status, which means that the transaction should not be in this status for a long period. |
| Completed | When JumiaPay already did all the accounting movements correctly. At this point, the money is already on the merchant's shop account. |
| Failed | When an error occurs on JumiaPay system or the transaction is cancelled through the Cancel Purchase request. |
| Cancelled | When the transaction is cancelled by the customer on JumiaPay website or on JumiaPay side. |
| Expired | The transaction status is changed to Expired 30 min after its creation if the payment to fund it is not successful. |
You can also use our Verify Status of Purchase request to confirm the status of your transactions. Learn more about this on the next section.
Verify Status of Purchase
Calling our /merchant/transaction-events endpoint will give you visibility on the status changes of a transaction until its current status. You initiate this request by using the Transaction Id that we return to you on the Create Purchase success response. You'll also need to send the Id that identifies your shop, which you can get by following our instructions on Get Started - Step 3.
Cancel Purchase
Calling our /merchant/cancel endpoint allows you to cancel a transaction with the following status:
-
Created: at this stage, no money has been captured from the customer's payment instrument yet, which means that the money necessary for the transaction to go forward is still on the customer side.
-
Confirmed or Committed: at these stages the capture of the money was already done, which means that the money necessary for the transaction to go forward is already on JumiaPay side. Please note that if the transaction is cancelled at this point, the amount captured from the customer's payment instrument will not be sent back to his payment instrument, but will be released on the customer's JumiaPay account instead.
You initiate this request by using the Transaction Id that we return to you on the Create Purchase success response. You'll also need to send the Id that identifies your shop, which you can get by following our instructions on Get Started - Step 3.
Create Refund
Calling our /merchant/refund endpoint enables you to refund transactions made by your Business through JumiaPay. A refund can only be made when the transaction is completed.
To do so, you'll need to send us the refund Amount, the Currency, the Transaction Id, an Unique Reference generated by you to identify the refund, the Id that identifies your shop (which you can get by following our instructions on Get Started - Step 3) and a brief Description of the refund.
Note that:
- The refund amount cannot exceed the transaction amount.
- The currency must be the same as the transaction currency.
- The transaction id can be the one provided by us on the Create Purchase success response or the unique reference that you used to identify the transaction on your system.
How and when your customer is refunded depends on how he made the payment:
-
When the payment is done via Bank Transfer, Verve card or Fawry the refunded amount will be debited from your JumiaPay shop account and released on the customer's JumiaPay account. Then, your customer can either spend his balance in another purchase paid through JumiaPay or withdraw his money to his bank account on the JumiaPay website.
-
When the payment is done via Mastercard, Visa or Meeza Digital - Mobile Wallets, the refunded amount will be debited from your JumiaPay shop account and moved back to the payment instrument used by the customer.
-
When the payment only uses JumiaPay balance, the refunded amount will be debited from your JumiaPay shop account and return to the customer's JumiaPay account.
Once you send the request to create a refund, we'll update you on whether the refund was successful or not.
You may also check the refunds status on your JumiaPay Business account, on the Merchant module by clicking on your Shop > Refunds.
Here's a brief explanation of the possible status a refund can assume:
| Status | Description |
|---|---|
| Created | It's the first status of a refund in JumiaPay. When we get the request from the merchant, the refund will be in this status. |
| Completed | When the refund is completed on JumiaPay side. If the payment was done via Bank transfer, Verve card, Fawry or JumiaPay balance, the money should be available on the customer's JumiaPay account at this point. If the payment was done via Mastercard, Visa or Meeza Digital - Mobile Wallets, the refund amount can either be already back to the customer's payment instrument or waiting for the bank to process it. |
| Failed | When an error occurs on JumiaPay system. |
Callback
When a purchase transaction is created, JumiaPay will automatically notify you everytime there's a change of its status by using the purchaseCallbackUrl parameter sent on the Create Purchase request.
It's very important that you check our Callback response to confirm the transaction status before delivering value to the customer!
Here's an example of the request body that JumiaPay will send to you upon callback:
{
    "transactionEvents": [
        {
            "id": "AAEAAAA6hpLxWNDtbGEu9SKCl8ivNNHs3luQrpBi17C8HGcRtsWf3I5t",
            "creationDateTime": "2018-04-04T09:59:48Z",
            "transactionType": "Purchase",
            "newStatus": "Confirmed",
            "oldStatus": "Created",
            "transactionId": "AAEAAADoKU7Q321mnk6XFV_4zvOamJidaWFOstEyMDX-YSMJBwgC0cTW",
            "merchantReferenceId": "1522835946",
            "shopConfigurationId": "AAEAAADoKU7YItWSEhYpJRb0fV842USafymz4Vs2onKOPsMPlnU9LFrt",
            "paymentInstrumentType": "CreditCard",
            "paymentMethod": "Mastercard",
            "chargeStatus": "Success"
        },
        {
            "id": "AAEAAAA6hpLxWQo_oVfSAqSGXK8LgOjG_5sfMlTCjjQGfpdMz3zTqdQ-",
            "creationDateTime": "2018-04-04T09:59:48Z",
            "transactionType": "Purchase",
            "newStatus": "Committed",
            "oldStatus": "Confirmed",
            "transactionId": "AAEAAADoKU7Q321mnk6XFV_4zvOamJidaWFOstEyMDX-YSMJBwgC0cTW",
            "merchantReferenceId": "1522835946",
            "shopConfigurationId": "AAEAAADoKU7YItWSEhYpJRb0fV842USafymz4Vs2onKOPsMPlnU9LFrt",
            "paymentInstrumentType": "CreditCard",
            "paymentMethod": "Mastercard",
            "chargeStatus": "Success"
        }
    ]
}
Test Data
Use our sandbox to test your integration!
You can test the different transaction status JumiaPay could retrieve by following these guidelines:
| Status | Description |
|---|---|
| Created | A transaction will be created as soon as you send the Create Purchase request and redirect to JumiaPay. If you don't proceed with a successful payment the transaction will stay in the status 'Created' for 30 minutes, after that it will expire. |
| Completed | On JumiaPay checkout page, select the available payment method. Insert the test data provided at the bottom of this section for a successful payment and click on the Pay Now button. The transaction status will move from 'Created' to 'Confirmed', 'Committed' and then 'Completed'. |
| Failed | A transaction will be failed as soon as you send the Cancel Purchase request. |
| Cancelled | On JumiaPay checkout page, click on the Back to Merchant button at the bottom of the page and confirm the transaction cancellation. The transaction status will move from 'Created' to 'Cancelled'. |
| Expired | After the transaction creation, it will move to the status 'Expired' after 30 min if you don't proceed with a successful payment. |
You may also test the user experience on JumiaPay checkout by simulating if a payment is successful or not by using specific card schemes:
-
Go to https://www.getcreditcardnumbers.com/ or https://namso-gen.com/ to get valid credit card numbers for testing purposes.
-
If you want to simulate a payment that is pending, use a card number started with 51.
-
If you want to simulate a payment that failed, use a card number started with 52.
-
If you want to simulate a successful payment, use any other card number.
Note that the Expiry Date can be any date in the future and the CVV can be any three digit number.
Errors
Confirm which errors can be returned in each request by checking out our API Documentation.
Plugins
JumiaPay plugins will allow you to easily integrate JumiaPay as a payment gateway on your website, saving you some work and time.
On your website checkout, your customers will be able to select JumiaPay to proceed with their orders payment.
After selecting it and place order, your customers will be redirected to JumiaPay where they can login or create an account. Once the login is made, they'll see the JumiaPay checkout page where they can select a payment method, insert their payment details and complete the payment. After the payment is done, they'll be redirected to your website.
These are the plugins that we currently offer:
WordPress
JumiaPay WooCommerce Payment Gateway is currently meant to be used by businesses in Nigeria and Egypt.
Pre-requisites
-
Open a JumiaPay Business account and follow our instructions on how to activate your business and get credentials to proceed with the plugin installation. To do so, follow the steps described on Get Started.
-
Instal and activate the JumiaPay WooCommerce Payment Gateway on your WordPress website. Follow the instructions described on Installation.
Installation
Automatic Installation
-
Login to your WordPress Admin Area.
-
Click on Plugins > Add New.
-
Search for 'JumiaPay WooCommerce Payment Gateway' in the search bar.
-
From the search result you'll see the JumiaPay WooCommerce Payment Gateway, click on the Install Now button.
-
After the installation is complete, activate the plugin.
-
Proceed with the configurations described on Configuration.
Manual Installation
-
Download JumiaPay plugin zip file here.
-
Login to your WordPress Admin Area.
-
Click on Plugins > Add New > Upload Plugin.
-
Click on Choose File to select the plugin zip file from your computer. After the file is chosen, click on the Install Now button.
-
Once the plugin is successfully installed, click on the Activate Plugin button.
-
Proceed with the configurations described on Configuration.
Configuration
-
Go to WooCommerce > Settings and click on General from the top tab.
-
On Currency options set the Currency with the official currency of the country where you're selling (eg. 'Nigerian Naira' for Nigeria and 'Egyptian pound' for Egypt) and the Number of decimals as '2'.
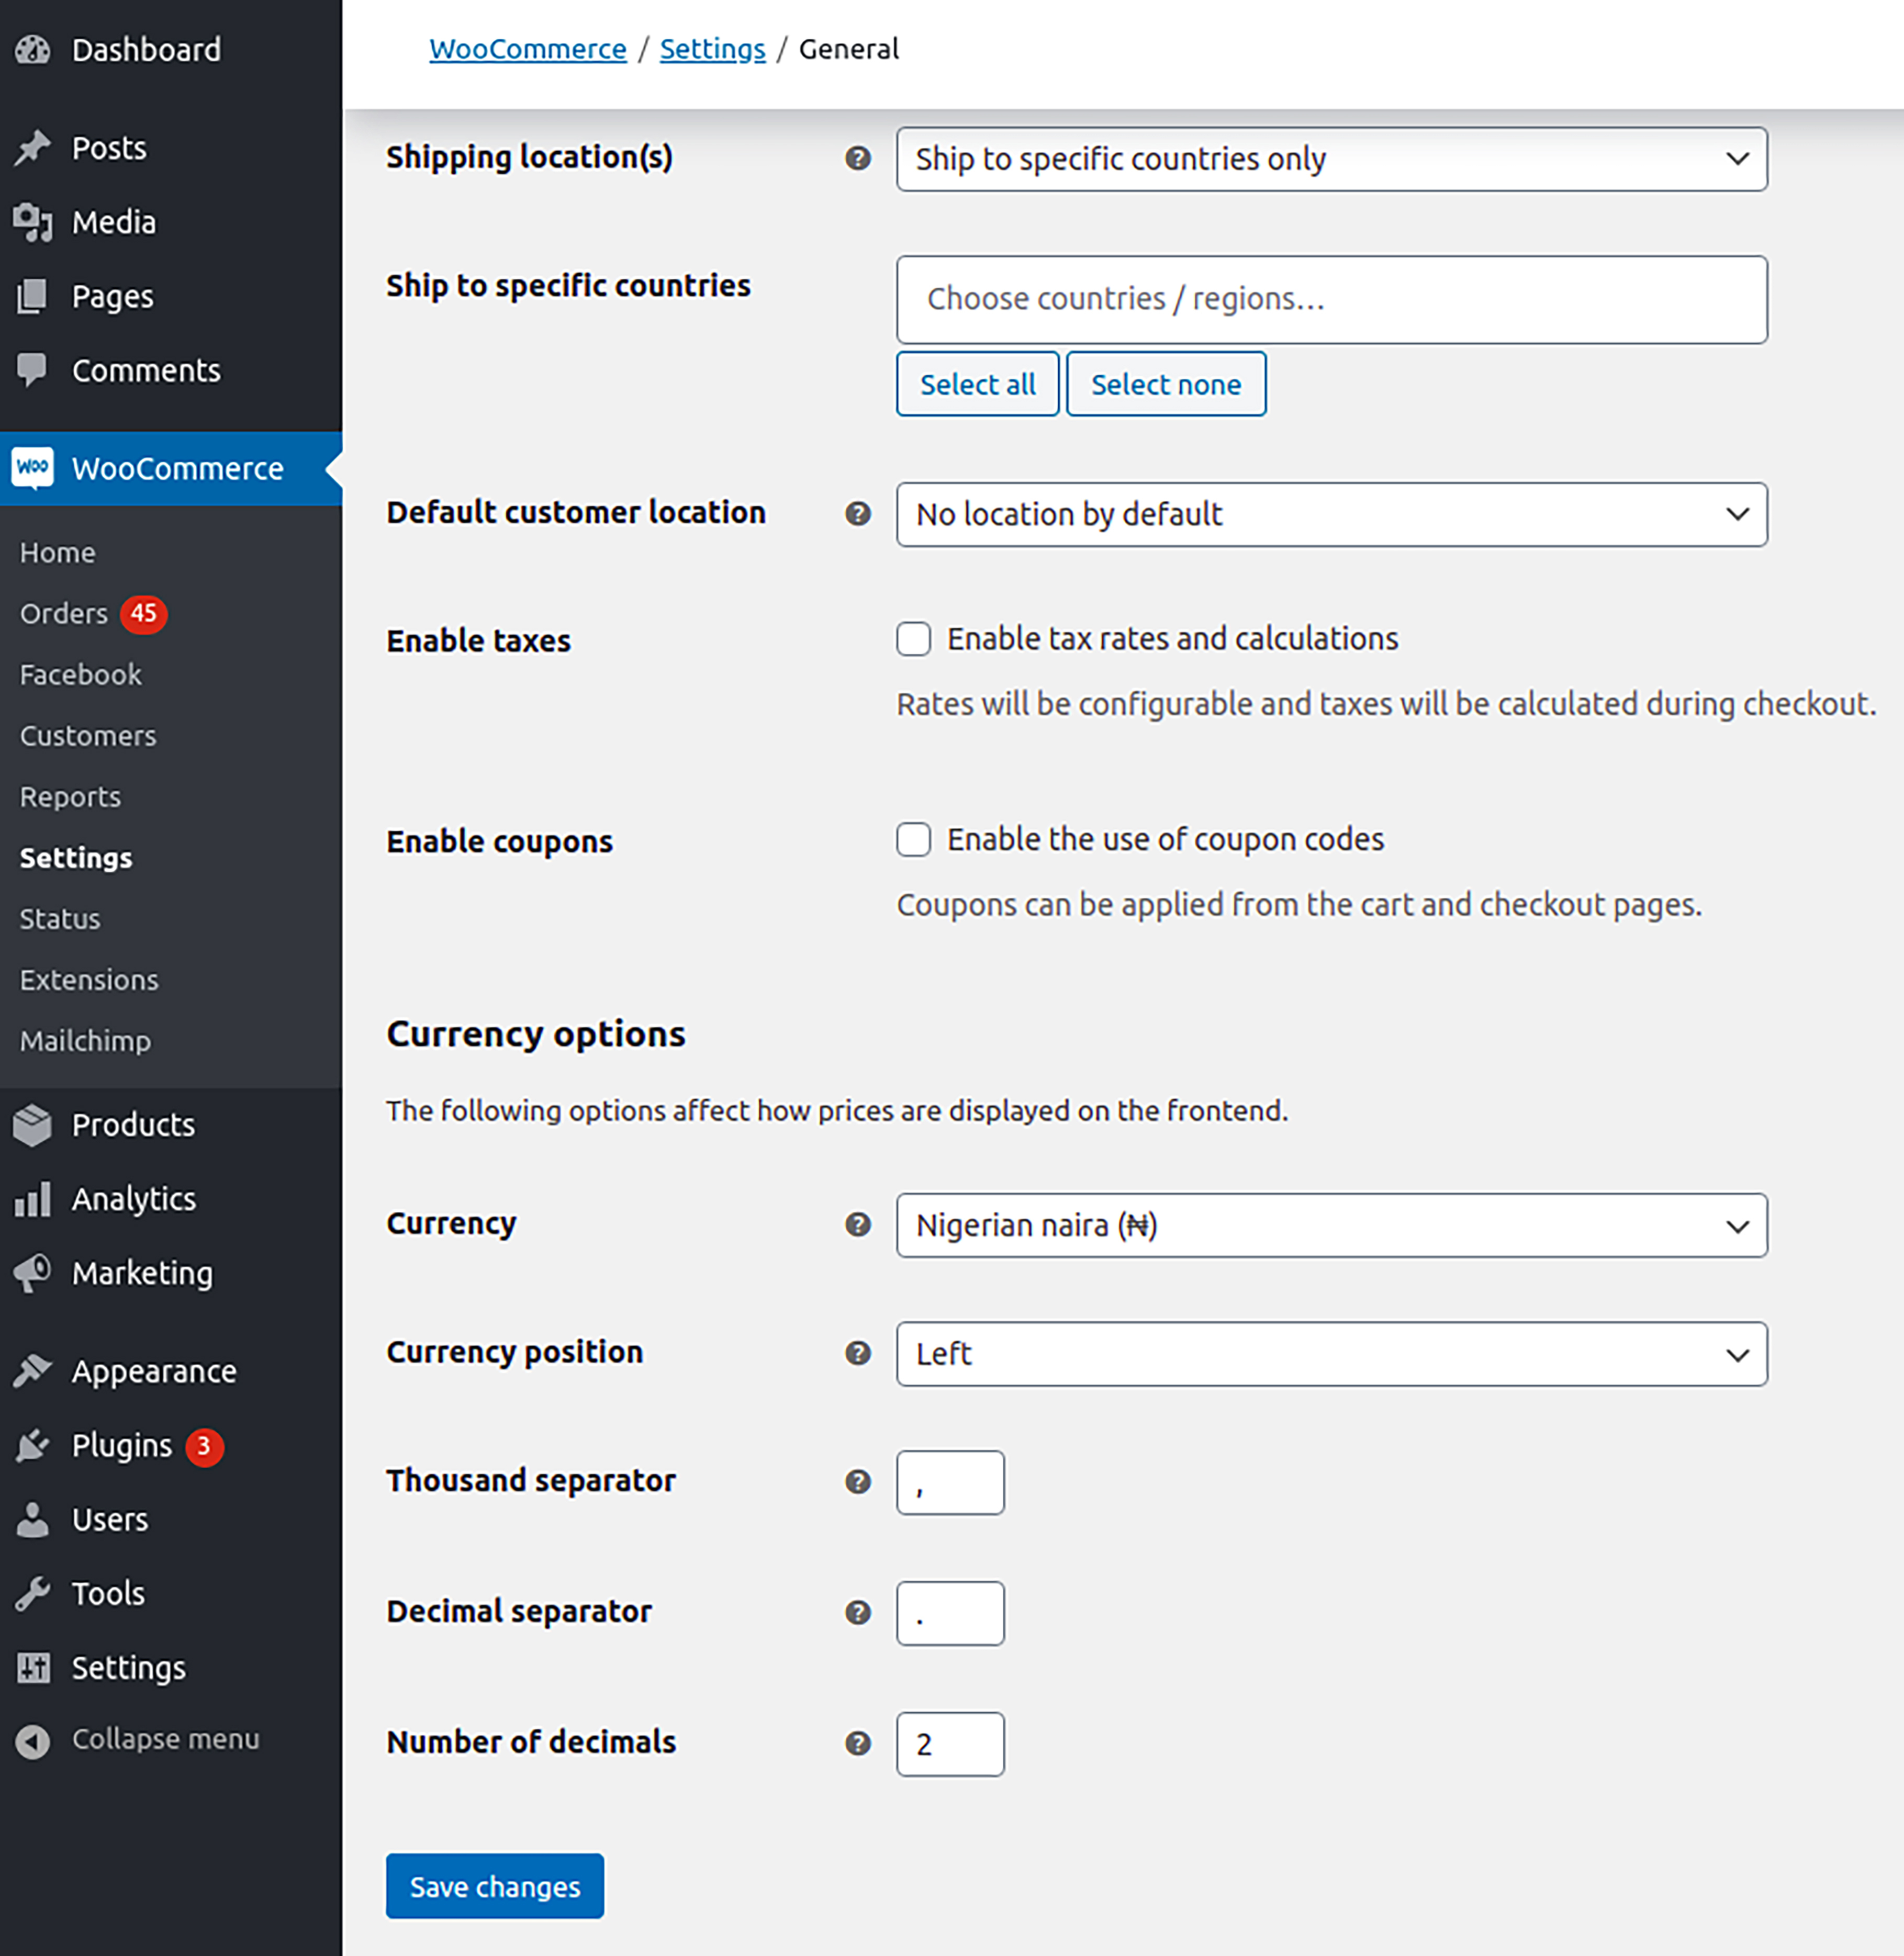
-
Click on the Save Changes button.
-
Then, click on Payments from the top tab and click on JumiaPay from the available list in order to configure this payment option:
-
Enable/Disable: check the box to enable JumiaPay payment option on checkout.
-
Environment: you may select 'Sandbox' or 'Live'. Select 'Sandbox' to test payments done through JumiaPay before going live. Once you're ready to accept real payments on your site, select 'Live'.
-
On Live Settings:
- Country List: Select the country where you're operating. This plugin is meant to be used in Nigeria or Egypt.
- Shop Key: Access your live JumiaPay Business account. Then, click on the Shop Configurations module, copy the Shop key and paste it here.
- Merchant API Key: API key that will identify your Business. This key will be provided by JumiaPay team as soon as you create your JumiaPay Business account follow the onboarding steps and your business gets approved.
-
On Sandbox Settings:
- Country List: Select the country where you're operating. This plugin is meant to be used in Nigeria or Egypt.
- Shop Key: Access your JumiaPay Business test account. Then, click on the Shop Configurations module, copy the Shop key and paste it here.
- Merchant API Key: API key that will identify your Business. This key will be provided by JumiaPay team as soon as you create your JumiaPay Business account, follow the onboarding steps and your business gets approved.
-
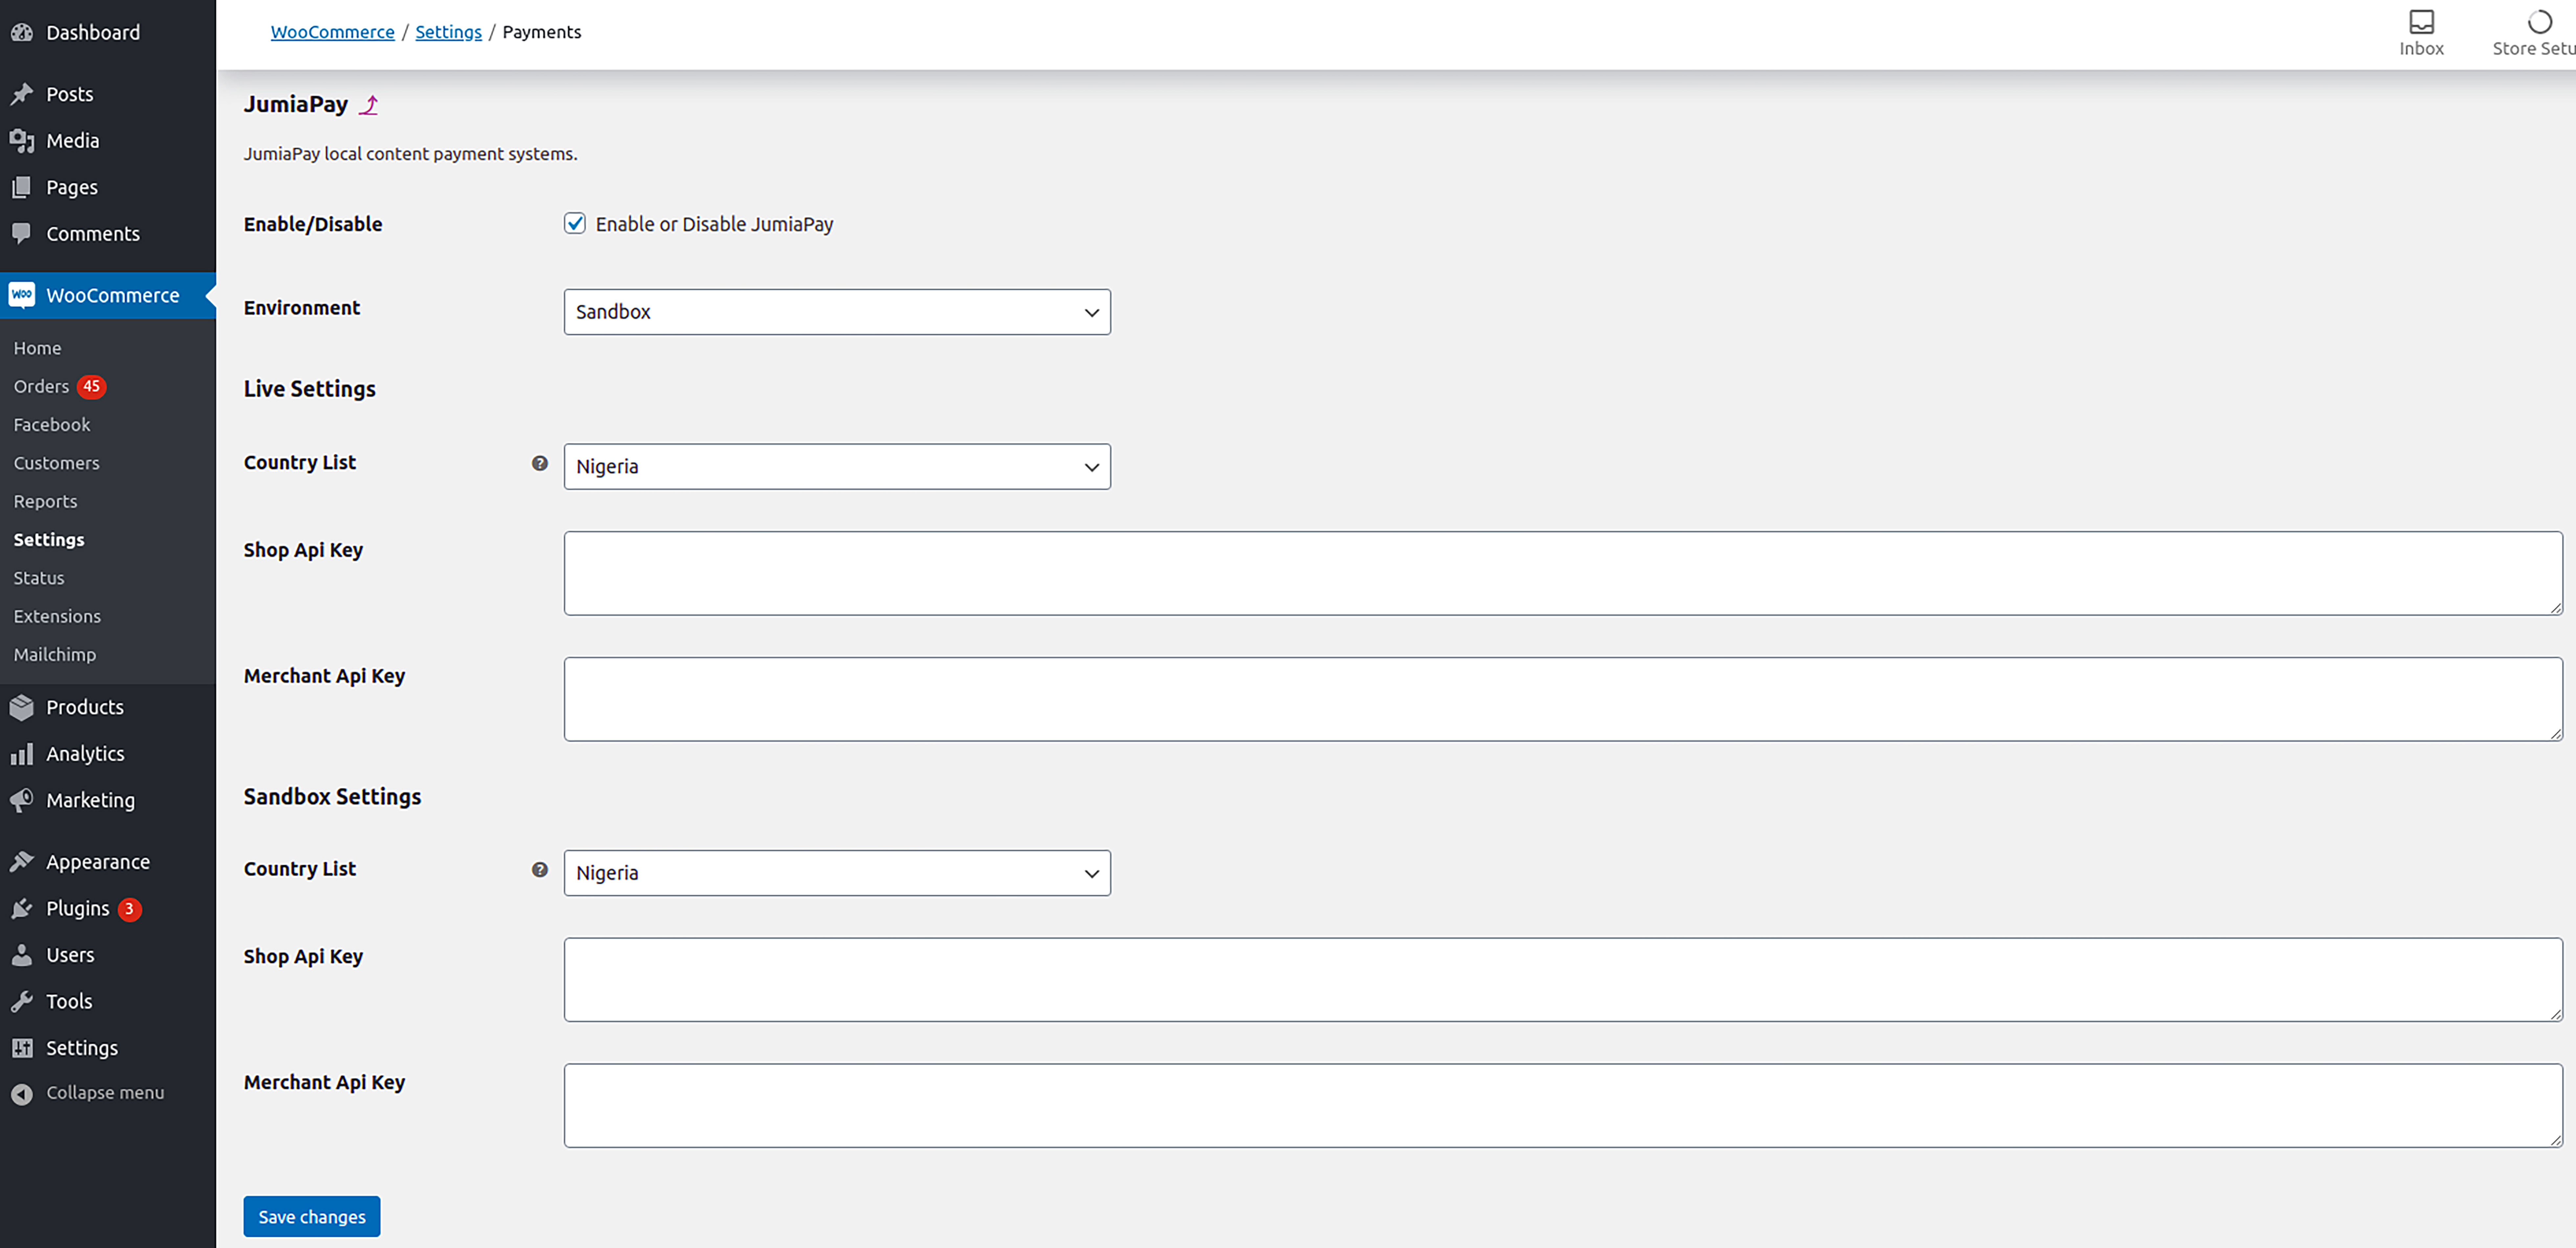
- Click on the Save Changes button.
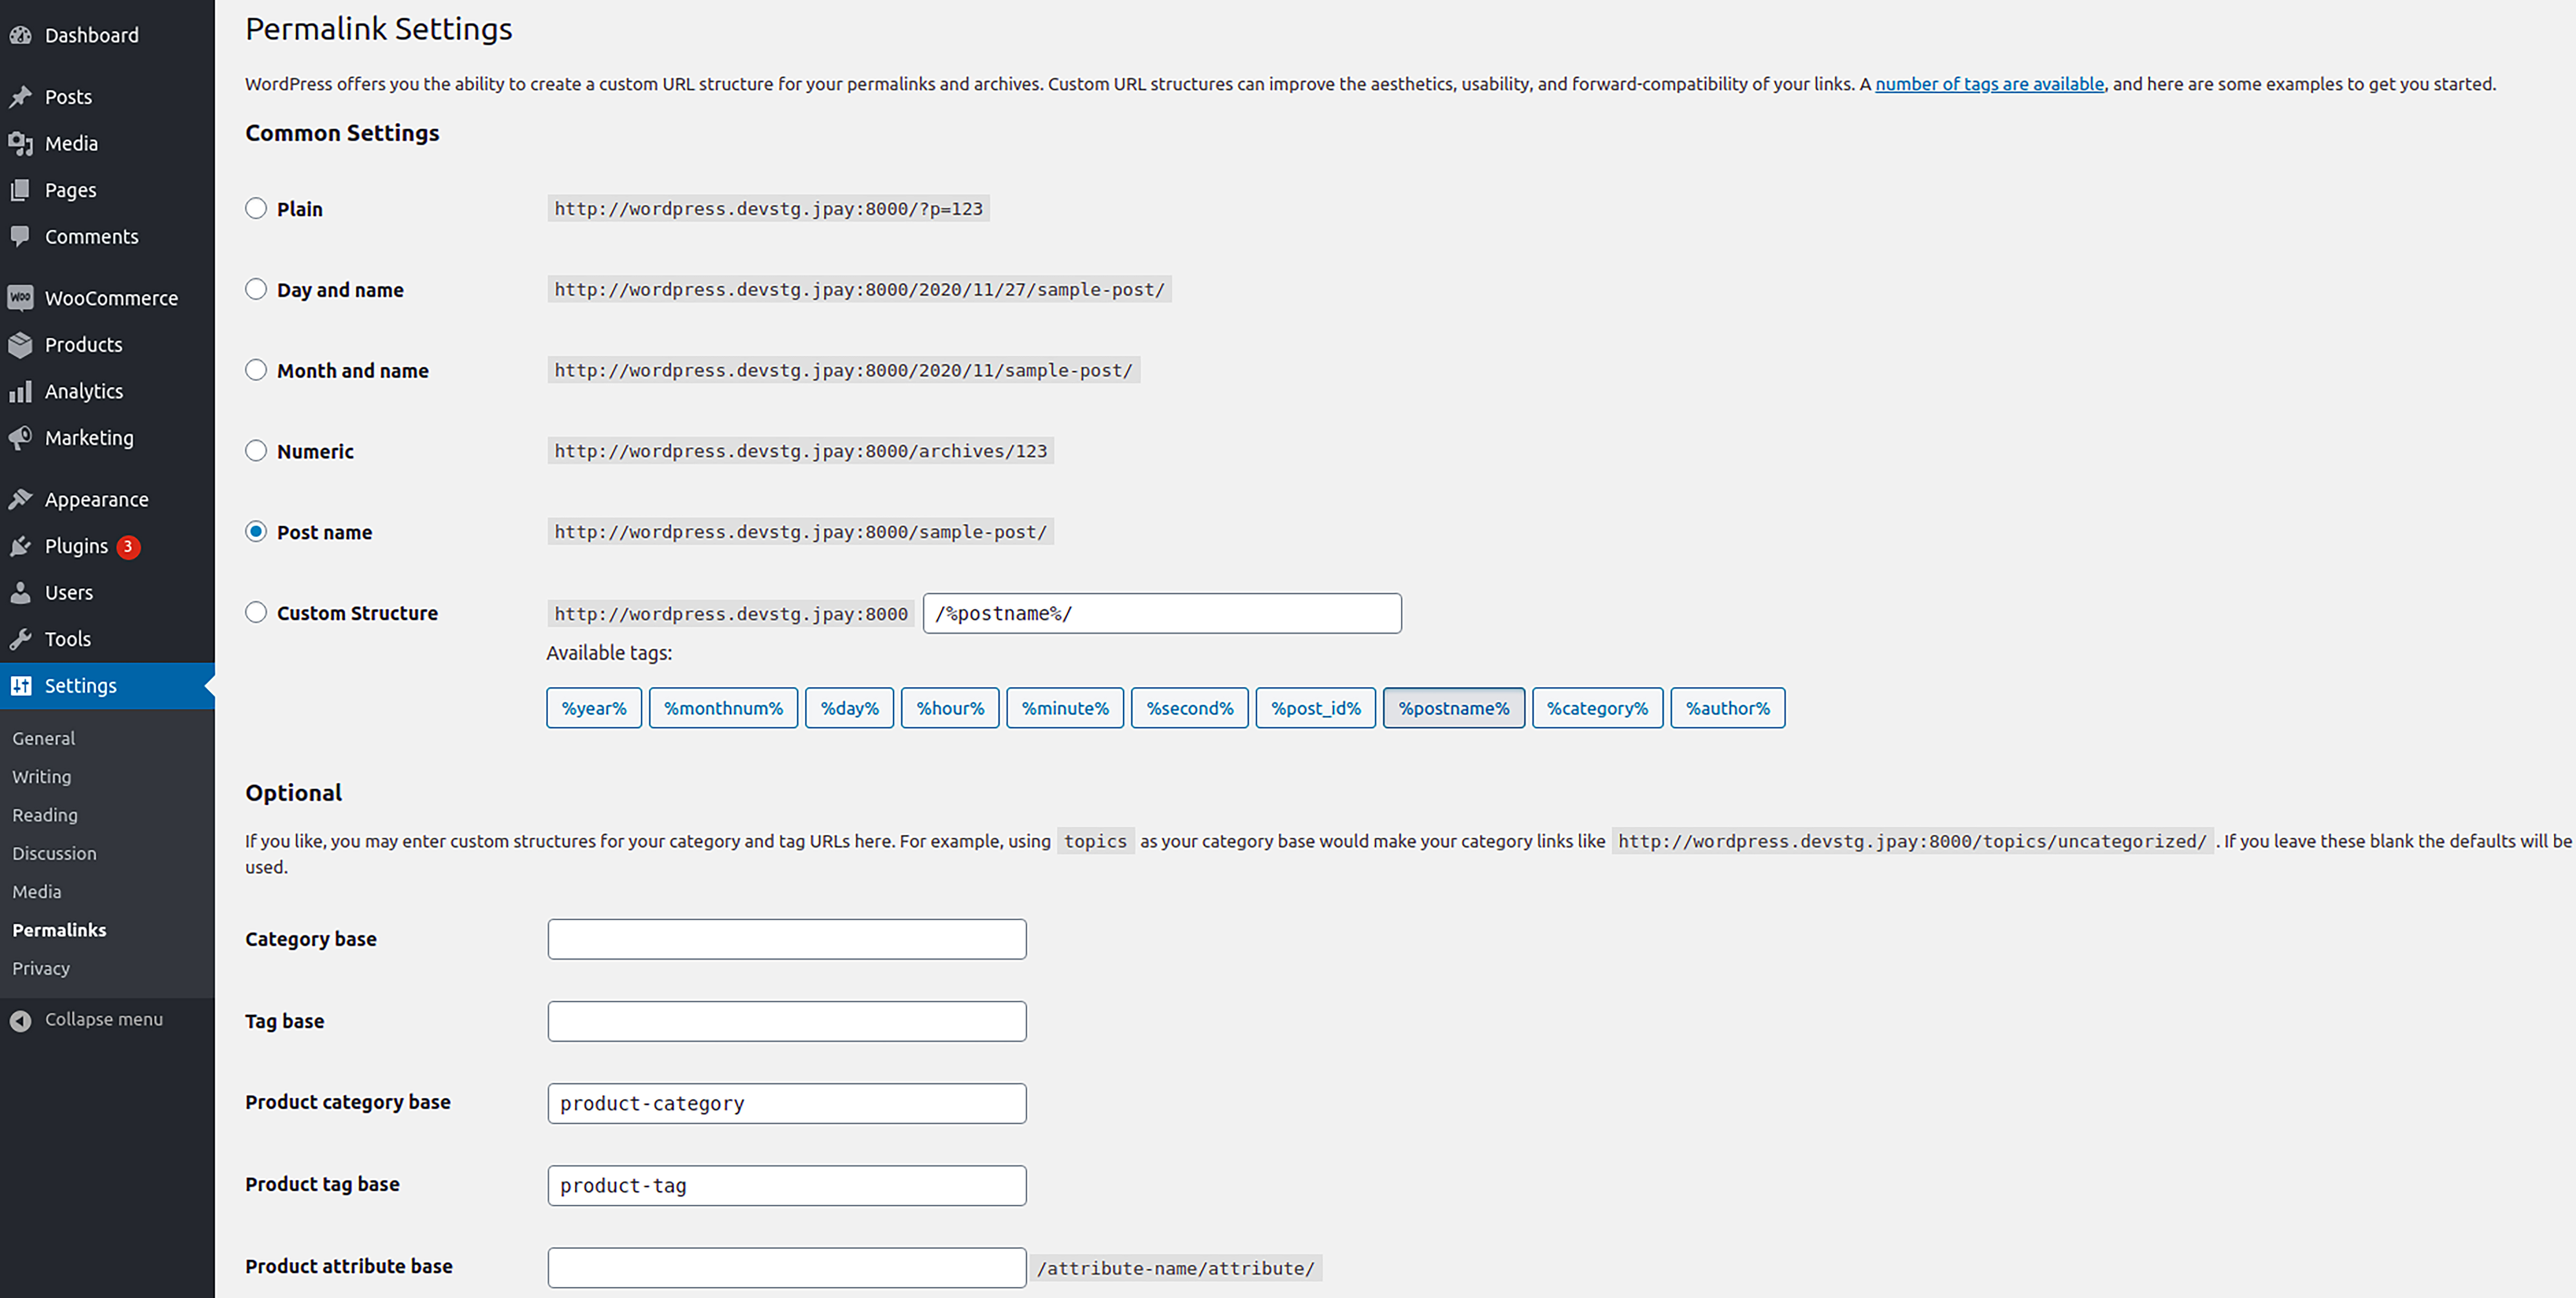
- On WordPress Settings on the left hand side, go to Permalinks and on Common Settings select one of the following options: Day and name, Month and name, Numeric and Post name. For more information about these Permalink Settings, consult the WordPress Support documentation.
- Click on the Save Changes button.
Accept Payments
After a payment is done by the customer, there is two possible ways for you to check its status on JumiaPay:
-
On WordPress, go to WooCommerce > Orders and click on the desired order to see its details. On the right hand side on Order notes, you'll be able to see the transaction status on JumiaPay side.
-
On JumiaPay Business, login into your account and on the Merchant module click on your Shop > Purchases to see all your transactions listed and their status. You can also search by a customer email address or a merchant reference to find a specific transaction. By clicking on it you'll be able to see its details.
Here's a brief explanation of the possible status a transaction can assume on JumiaPay:
| Status | Description |
|---|---|
| Created | It's the first status of a transaction in JumiaPay. When we get the request from the merchant, the transaction will be in this status. |
| Confirmed | When we get a successful payment to fund the transaction. At this point, the money is already on JumiaPay side. This is a transitory status, which means that the transaction should not be in this status for a long period. |
| Committed | When the merchant confirms that he received our notification and that he'll fulfill. Today this is done automatically by our system, there's no need of confirmation by the merchant. This is a transitory status, which means that the transaction should not be in this status for a long period. |
| Completed | When JumiaPay already did all the accounting movements correctly. At this point, the money is already on the merchant's shop account. |
| Failed | When an error occurs on JumiaPay system or the transaction is cancelled by the merchant on WordPress. |
| Cancelled | When the transaction is cancelled by the customer on JumiaPay website or on JumiaPay side. |
| Expired | The transaction status is changed to Expired 30 min after its creation if the payment to fund it is not successful. |
Cancel Payments
You'll only be able to cancel a transaction if it still is with one of the following status on JumiaPay side:
-
Created: at this stage, no money has been captured from the customer's payment instrument yet, which means that the money necessary for the payment to go forward is till on the customer side.
-
Confirmed or Commited: at these stages the capture of the money was already done, which means that the money necessary for the payment to go forward is already on JumiaPay side. Please note that if the transaction is cancelled at this point, the amount captured from the customer's payment instrument will not be sent back to his payment instrument, it will be released on the customer's JumiaPay account instead.
If the transaction still presents one of these status and you wish to cancel it, go to WooCommerce > Orders and click on the desired order to see its details. Then, change the order status to 'Cancelled' and update. After you do this, the transaction status will be updated to 'Failed' on JumiaPay side and we'll inform you about the cancellation success or failure on the Order notes.
Create Refunds
In order to refund your customers go to WooCommerce > Orders and click on the desired order to see its details. There you'll find a Refund button. By clicking on it you can see the Amount already refunded and the Total available to refund. If you wish to proceed with a refund via JumiaPay, fill the Refund amount and click on the Refund via JumiaPay button.
You can also refund a customer through your JumiaPay Business account. On the Merchant module, click on your Shop > Purchases to see all your transactions listed, search by the one you want to refund and click on it to see its details. There you'll find a Refund button.
Note that:
- Refund via JumiaPay can only be made if the order was paid via JumiaPay.
- Refund via JumiaPay can only be made if you have sufficient funds on your JumiaPay shop account. To confirm this access to your JumiaPay Business account, click on Your Accounts module and check your shop balance.
- Refund via JumiaPay can only be made if the transaction reached the status 'Completed'.
- Refund amount cannot exceed the Total available to refund amount.
How and when your customer is refunded depends on how he made the payment on JumiaPay:
-
When the payment is done via Bank Transfer, Verve card or Fawry the refunded amount will be debited from your JumiaPay shop account and released on the customer's JumiaPay account. Then, your customer can either spend his balance in another order paid through JumiaPay or withdraw his money to his bank account on the JumiaPay website.
-
When the payment is done via Mastercard, Visa or Meeza Digital - Mobile Wallets, the refunded amount will be debited from your JumiaPay shop account and moved back to the payment instrument used by the customer.
-
When the payment only uses JumiaPay balance, the refunded amount will be debited from your JumiaPay shop account and return to the customer's JumiaPay account.
You'll be able to check the status of your refunds done via JumiaPay by either:
-
Access to WordPress, go to WooCommerce > Orders, click on the desired order and check the Order notes on the right hand side.
-
Access JumiaPay Business, login into your account and on the Merchant module click on your Shop > Refunds to see all your refunds listed and their status.
Here's a brief explanation of the possible status a refund can assume:
| Status | Description |
|---|---|
| Created | It's the first status of a refund in JumiaPay. When we get the request from the merchant, the refund will be in this status. |
| Completed | When the refund is completed on JumiaPay side. If the transaction was paid via Bank transfer, Verve card, Fawry or JumiaPay balance, the money should be available on the customer's JumiaPay account at this point. If the transaction was paid via Mastercard, Visa or Meeza Digital - Mobile Wallets, the refund amount can either be already back to the customer's payment instrument or waiting for the bank to process it. |
| Failed | When an error occurs on JumiaPay system. |
Test Data
Apply the Sandbox Settings described on Configuration to test the JumiaPay integration on your website.
You can test the different transaction status JumiaPay can retrieve by following these guidelines:
| Status | Description |
|---|---|
| Created | A transaction will be created as soon as you select the JumiaPay option on your website checkout, place order and are redirected to JumiaPay. If you don't proceed with a successful payment the transaction will stay in the status 'Created' for 30 minutes, after that it will expire. |
| Completed | On JumiaPay checkout page, select the available payment method. Insert the test data provided at the bottom of this section for a successful payment and click on the Pay Now button. The transaction status will move from 'Created' to 'Confirmed', 'Committed' and then 'Completed'. |
| Failed | A transaction will be failed as soon as you cancel a transaction on WordPress with success. On Orders > Order notes will be shown a message informing if the transaction cancellation was successful or not. |
| Cancelled | On JumiaPay checkout page, click on the Back to Merchant button at the bottom of the page and confirm the transaction cancellation. The transaction status will move from 'Created' to 'Cancelled'. |
| Expired | After the transaction creation, it will move to the status 'Expired' after 30 min if you don't proceed with a successful payment. |
You may also test the user experience on JumiaPay checkout by simulating if a payment is successful or not by using specific card schemes:
-
Go to https://www.getcreditcardnumbers.com/ or https://namso-gen.com/ to get valid credit card numbers for testing purposes.
-
If you want to simulate a payment that is pending, use a card number started with 51.
-
If you want to simulate a payment that failed, use a card number started with 52.
-
If you want to simulate a successful payment, use any other card number.
Note that the Expiry Date can be any date in the future and the CVV can be any three digit number.
WebView for Mobile Applications
Businesses with Android or IOS applications can also use JumiaPay checkout to accept online payments by using a WebView. To do so, you can use our Merchant API integration to generate a JumiaPay checkout url and embody it in WebView on your mobile app.
1. Get JumiaPay checkout url
Call our /merchant/create endpoint to create a transaction on JumiaPay and we'll return to your server a JumiaPay checkout url on the success response.
You'll need to collect and send us some customer information, such as the Email Address, IP Address and Country. You'll also need to send the transaction Total Amount, Currency, some Basket Details like the Product(s) Name, Quantity and Price Amount, an Unique Reference to identify the transaction on your system, the Id provided by us to identify your shop (which you can get by following the instructions on Get Started - Step 3), a Return Url and a Callback Url.
This endpoint is a POST request from your server to our API.
2. Display JumiaPay checkout url in a WebView on the mobile app
When the API call is successful, its response will return a checkoutUrl that should be sent to the frontend and loaded in the WebView on your native mobile application.
Note that some of the payment methods available on JumiaPay redirect the customer to other web pages for customers to fill in OTP/PIN and allow payment authorization. Therefore, the WebView should allow redirects, otherwise customers won’t be able to complete their transactions.
After the JumiaPay checkout is loaded in the WebView, you should listen for url redirects in the WebView in order to know your customers actions.
3. Listen for JumiaPay redirection to your Return url
Once the customer confirms the payment, he'll be redirected to the website set by you on the purchaseReturnUrl parameter sent when calling the /merchant/create endpoint.
Note that JumiaPay sends a status parameter (Success/Failure) together with the
purchaseReturnUrl, but this status refers to sending the payment confirmation to the payment gateway. This isn't the transaction status, so don't use this parameter to deliver the transaction status to your costumer! The transaction status should be confirmed on JumiaPay callback or by calling our Verify Status of Purchase endpoint (both described below).
At this point, you can have your WebView listening for when JumiaPay redirects to the purchaseReturnUrl to set the handover control from the page sent on purchaseReturnUrl to your native application and continue processing as usual.
3. Check JumiaPay Callback
Sending us a purchaseCallbackUrl when calling the /merchant/create endpoint will enable JumiaPay to call this url and send you an update of the transaction status everytime it changes.
It's very important that you check our Callback response to confirm the transaction status before delivering value to the customer! Be aware that just because the customer reached your
purchaseReturnUrl, it doesn't mean the transaction is already successful. The transaction should only be considered successful when it reaches the status 'Completed' on JumiaPay side, never before.
You may find an example of the Callback request body that JumiaPay will send to you here.
Here's a brief explanation of the possible status a transaction can assume:
| Status | Description |
|---|---|
| Created | It's the first status of the transaction in JumiaPay. When we get the request from the merchant, the transaction will be in this status. |
| Confirmed | When we get a successful payment to fund the transaction. At this point, the money is already on JumiaPay side. This is a transitory status, which means that the transaction should not be in this status for a long period. |
| Committed | When the merchant confirms that he received our notification and that he will fulfill. Today this is done automatically by our system, there's no need of confirmation by the merchant. This is a transitory status, which means that the transaction should not be in this status for a long period. |
| Completed | When JumiaPay already did all the accounting movements correctly. At this point, the money is already on the merchant's shop account. |
| Failed | When an error occurs on JumiaPay system or the transaction is cancelled through the Cancel Purchase request. |
| Cancelled | When the transaction is cancelled by the customer on JumiaPay website or on JumiaPay side. |
| Expired | The transaction status is changed to Expired 30 min after its creation if the payment to fund it is not successful. |
You can also use our Verify Status of Purchase request to confirm the status of your transactions. Learn more about this here.